Friday, June 22, 2012

My Summer Mantle

I'm linking up with The Shabby Next for Frugal Friday.
I've been on summer vacation since the end of May but I'm just now getting around to changing my mantle decor from Spring to Summer. And I was bound and determined to do it without spending a dime. 

I just reused the window and candles from my Spring mantle. The word Summer I already had from my class at The Little Blue House.

The apothecary jar is from my Spring mantle. I just replaced the eggs that were in there with seashells from our trip to a beach in South Carolina.  The starfish I had from Sophia's 2nd birthday (Nemo theme). 

I added the shutter to give a beach cottage feel. I already had it from a trip to Canton (a huge flea market for $1). I had the black spray paint left over from my Command Center project. The scrapbook paper I already had. The twine I already had. And the clothespins I already had. I spray painted them light blue (I already had the spray paint). And I just found a couple of pictures to throw up there.

It felt good to make myself just use what was on hand and not spend money.


Thursday, June 21, 2012

The Shutter Project


I started with this old shutter that I bought at Canton (in the junk section) for $1. I'm not sure if that's a good price. But it sounded good to me. I cleaned it up with a little soap and water and a damp cloth.


Then I made a bunting using a placemat where I held down a length of twine down with clothespins. Then I stuck my triangles on top using Zip Dry. (P.S. I inked the edges of all the triangles, just cause, that's how I roll. And I started with a 4 inch square. It just depends on your shutter, or whatever you're adding a bunting to, but that size worked best. Scale is important).


Then I taped my bunting in place.

Then I added twine, clothespins and photos. Originally, I had clothes pinned 3 photos on one strand of twine. But that was just too much. So I edited.

Editing is so important! I leave things up for a while before I stick with it. And like with the bunting, I used tape before I used  a staple gun to make it final.


Linking Up With These Great Blogs:

Alderberry Hill,      Tutus and Tea Parties,      The Rustic Pig Designs     Or So She Says,      My 1929 Charmer,      Super Handmade Sunday @ A Cat- Like Curiosity,      Lil' Luna          Craft Geek,      Simple As That      House on the Way,      Sassy Sites     Mindy May's Market,   Skip To My Lou,        Sugar Bee Crafts,      Cheap Crafty Mama,      Be Different, Act Normal,   Homemaker In Heels,     The Busy Bee's,      Fireflies and Jellybeans   The Shabby Creek Cottage,     30 Handmade Days    52 Mantels,     The Shabby Nest    Lovely Crafty Home See Vanessa Craft,     Blissful Bucket List,     Bacon Time With The Hungry Hypo    Lena B, Actually,     Pocket Full of Pink,     Family Ever After,      I Heart Naptime,     Six Sisters Stuff Nifty Thrifty Things,     Homemaker on a Dime,     Under The Table and Dreaming,     Flamingo Toes   It's Overflowing,    Ivy And Elephants   Clean and Scentsible,    Creations by Kara,     Tip Junkie,      Love and Laundry,      Create. Craft. Love.,     Sarah Dawn Designs,     One Artsy Mama,      Tatertots and Jello,     The Grant Life,     The Hubby Made Me,     Kitchen Fun With My Three Sons,       The Chiffon Diary,     Manic Mother    The Thriftiness Miss,     Say Not Sweet Anne,     Becoming Martha,     Too Much Time On My Hands    Destination Craft,     The Dedicated House,      Katherine's Corner,   C.R.A.F.T.,    Fluster Buster,     Nap Time CreationsThe Mandatory MoochLamberts Lately


"Command Center"

I just couldn't wait! 
I had all of my pieces made for my "Command Center" (got my inspiration from my friend Kristy at Next to Heaven) and could not wait for my husband to hang it for me. He's my go- to person for hanging because he's very precise and measures/calculates things and only ends up making 1 hole compared to my 3-4.

But....when I took down what was on the wall, I noticed that there were 2 screws that were exactly in the middle and so I just started from there. I used the toothpaste trick I saw on Pinterest where you dab a little toothpaste on the bracket and then you place it on the wall and tap it where it will hang and then you have a mark to out your nail. It worked!
Here's what I started with! A bunch of junk from Goodwill and Canton.


And here's what I came up with...a little spray paint, scrapbook paper and I have a dry erase menu board.....

And a dry erase calendar....

...I used magnetic paint and fabric to make my memo board...

I used the screw that was already in the wall to hang a dry erase marker. I just tied some twine to it.


I used an old mail box to use for dumping the mail into. Eventually, I'd like to get a narrow console table to set below this with baskets for sorting the mail. And I hung our extra set of car keys from the little hooks.

I used a clip, frame, notepad and Super Glue to create a place to make a grocery list.

I really needed that toothpaste for the holes on the back of the mailbox because I had to make sure I got them in exactly the right spot. 

It's hard to see in this pic, but there are two marks with toothpaste on the wall. I just nailed my nails and used a damp cloth to remove the toothpaste.

I'm so excited to start using my "Command Center". Thanks Kristy for your inspiration! And I'm thankful for summer vacation to get time to create!
Linking Up With These Great Blogs:

Alderberry Hill,      Tutus and Tea Parties,      The Rustic Pig Designs     Or So She Says,      My 1929 Charmer,      Super Handmade Sunday @ A Cat- Like Curiosity,      Lil' Luna          Craft Geek,      Simple As That      House on the Way,      Sassy Sites     Mindy May's Market,   Skip To My Lou,        Sugar Bee Crafts,      Cheap Crafty Mama,      Be Different, Act Normal,   Homemaker In Heels,     The Busy Bee's,      Fireflies and Jellybeans   The Shabby Creek Cottage,     30 Handmade Days    52 Mantels,     The Shabby Nest    Lovely Crafty Home See Vanessa Craft,     Blissful Bucket List,     Bacon Time With The Hungry Hypo    Lena B, Actually,     Pocket Full of Pink,     Family Ever After,      I Heart Naptime,     Six Sisters Stuff Nifty Thrifty Things,     Homemaker on a Dime,     Under The Table and Dreaming,     Flamingo Toes   It's Overflowing,    Ivy And Elephants   Clean and Scentsible,    Creations by Kara,     Tip Junkie,      Love and Laundry,      Create. Craft. Love.,     Sarah Dawn Designs,     One Artsy Mama,      Tatertots and Jello,     The Grant Life,     The Hubby Made Me,     Kitchen Fun With My Three Sons,       The Chiffon Diary,     Manic Mother    The Thriftiness Miss,     Say Not Sweet Anne,     Becoming Martha,     Too Much Time On My Hands    Destination Craft,     The Dedicated House,      Katherine's Corner,   C.R.A.F.T.,    Fluster Buster,     Nap Time CreationsThe Mandatory MoochLamberts Lately


Wednesday, June 20, 2012

Dry Erase Calendar

I've been wanting to create a dry erase calendar for a while but just never had the time to make it happen....but hello summer vacation....and now I have time to create!

So I just started with an 11 x 14 size of tagboard (or posterboard, or thick cardstock) to match my 11 x 14 frame.

I decided to start with a square to begin with for the actual calendar portion so I made it 11 x 11. Then I cut strips using a coordinating paper for the top and bottom to add color and to tie it all together.


I used a very light background paper with a grid pattern to it so it was really easy to keep my lines straight. I just worked out my grid for the calendar on scrap paper before I transferred it to my scrapbook paper. I used a pencil to make my grid and then outlined it with Sharpie. Let me know if you'd like a more detailed tutorial on creating the grid. I didn't really want to bore you and I'm definitely not mathematically inclined.

I also added a few a shapes using my Cricut with coordinating papers. I inked all the edges before I glued the shapes down.

I slapped it in a spray painted Goodwill frame and now I just need to add June and the dates.


P.S. The shapes I added are from the Give a Hoot cartridge.


Menu Board

I was very inspired by my friends launch pad blog post at Next to Heaven. I really the whole dry erase concept and that it's all in one place.

In my "command center" I wanted to make an easy to read, dry-erase menu board. Here's what I came up with.
I  painted a Goodwill frame with black spray paint.

I started out by dividing an 11 x 14 piece of tagboard using coordinating papers. I added some black rick-rack to clearly define the days of the week. I used my Cricut to cut out the letters and the swirly.

Then I painted an old knife and fork (purchased at Canton in the "junky" section) with  light blue spray paint. I just used Super Glue to attach them to the frame.

Now I just have to get my husband to hang it up. LOL!


Tuesday, June 19, 2012

Magnets

I posted a tutorial yesterday on how to create a magnetic board using a broken mirror, magnetic paint and fabric.
So I thought I'd show you how I made my magnets to go on the magnetic board.

First, I picked the scrapbook paper to coordinate with the fabric I used on the board. Then I traced around my glass shapes. I bought some squares and circles from Sun and Moon Crafts.

I love the squares because they have the rounded corners and they're nice and thick. Of course you can also use the glass globs that you can find in the floral section of most craft stores.

I cut out my shapes.

I used some glue that I bought from Sun and Moon Crafts to see if it's better than Glossy Accents. I just brushed on a thin layer of the adhesive. After it was dry, I put a thick layer of glossy accents on the back of the paper to kind of "seal" it. I have to say, the glue did dry better than the Glossy Accents. I'm going to buy some Diamond Glaze and try that out later for comparison.


I Super Glued a magnet from Hobby Lobby on the back.

And now I have some cute magnets to use on my magnetic board.

I think I'm gonna make some for the fridge next!

Monday, June 18, 2012

Magnetic Bulletin Board

I was very inspired by my friends launch pad blog post at Next to Heaven. I really the whole dry erase concept and that it's all in one place.

So my newest project (which will be in pieces and involve me getting my husband to hang it for me, so it may take a while to see the finished project) is a "Command Center" the kitchen to have a menu board, a calendar, a place to sort the mail and hang important invitations, reminders etc.

So my first piece of this project is a magnetic board to hang invitations we get, reminders, Sophia's school calendar etc.


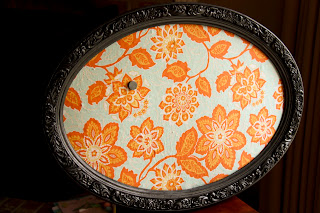
I started out with this broken mirror I found at Canton that I bought for a dollar. I spray painted the frame black and then removed the backing (the tan piece in the middle) and painted it with magnetic paint. Now let me tell you. Do NOT skimp on the magnetic paint. I started out using the Krylon spray paint version. Not very magnetic. Then I used the Martha Stewart product I found at Joann's. Hardly worked. Then I bought the $20 can of magnetic paint primer from Home Depot and it rocks! It was totally worth the $. Plus I only used about 1/16 of the can, so I see some  magnetic boards in my future.


Then I found a scrap remnant and sprayed the magnetic side of the backing with a sticky adhesive. I cut out around the board.


And installed it in the frame.

See the magnet on the left? Totally hanging tight.


The most expensive thing about this project was the magnetic paint. But I think it was totally worth it.

Project 52- Week 24

Week 24 features a pic of my dad and I on Father's Day.


Project 52- Week 23


My pic for week 23 is Sophia at her 4th birthday party at Build-A-Bear.