Wednesday, June 26, 2013

Lifestyle Crafts Sale

Hey y'all!
Lifestyle Crafts is currently running a special promo so that you can receive 40% off plus you can enter my code (Kaminski) for an additional 20% off! 
 
The sale will run June 26th - July 3rd. 

These are the items that will be on sale
Shape n Tape: Red, Gold and Navy
Twinkle EF0026  
Hamburger Box Dies DC0239
Food Tray Die DC0447
 
Happy shopping!

Monday, June 24, 2013

Name Plaque Re-do....Sophia's Choice

 A couple of years ago I made these name plaques found here. But the scrapbook papers were chosen by me.
 
We had to take them down last year when we got Sophia's bunk bed and I finally got a chance to reinstall them this summer. But I thought, why not let Sophia have some input into the colors chosen.
 
 Old version
 
New version
Sophia told me that she wanted some purple added to the mix.
 
It was very easy to update these plaques. The letters were just hot glued on so they were super easy to pop off.

Some of the old papers peeled off and some I just left on there.

I layed out my papers to see what order I wanted to put them in.
 
I layed the paper (good side down) on top of the plaque and rubbed the edge to get the shape to cut out.

Then I just modge podged them on there. Hot glued my letters back on and hung them back up.

Honestly, I like my first version better, but Sophia likes her version better. So since it's her room, I'm glad she's happy with her choices.

Friday, June 21, 2013

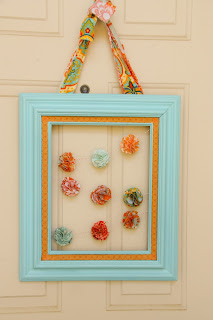
Spring/Summer "Wreath"

I say wreath because it's hanging in the same spot I normally put my wreaths (on the inside of our front door). But this is not circular...at all.
 
 I took an old Goodwill frame and spray painted it turquoise.
 
I added some washi tape on top of the "crunchy bits" around the frame.


Then I made pom-pom's via blogs (Cup of Delight and The Little Things). Both of these had great tutorials with lots of great step by step photos.

Then I strung up the pom-pom's on twine and practiced how I wanted them to hang using tape.


Eventually, once I figured out the pattern I wanted, I used a hot glue gun and staple gun to secure them.


Then I used fabric strips to create a way to hang it on my wreath door hanger.


Think I'm safe until Fall!
 
Linking Up With These Great Blogs:

Alderberry Hill,      Tutus and Tea Parties,      The Rustic Pig Designs,      Or So She Says,      My 1929 Charmer,      Super Handmade Sunday @ A Cat- Like Curiosity,      Lil' Luna          Craft Geek,      Simple As That,       House on the Way,      Sassy Sites,      Mindy May's Market,   Skip To My Lou,        Sugar Bee Crafts,      Cheap Crafty Mama,      Be Different, Act Normal,   Homemaker In Heels,     The Busy Bee's,      Fireflies and Jellybeans,    The Shabby Creek Cottage,     30 Handmade Days,     52 Mantels,     The Shabby Nest,     Lovely Crafty Home,  See Vanessa Craft,     Blissful Bucket List,     Bacon Time With The Hungry Hypo,     Lena B, Actually,     Pocket Full of Pink,     Family Ever After,      I Heart Naptime,     Six Sisters Stuff,  Nifty Thrifty Things,     Homemaker on a Dime,     Under The Table and Dreaming,     Flamingo Toes,    It's Overflowing,    Ivy And Elephants,    Clean and Scentsible,    Creations by Kara,     Tip Junkie,      Love and Laundry,      Create. Craft. Love.,     Sarah Dawn Designs,     One Artsy Mama,      Tatertots and Jello,     The Grant Life,     The Hubby Made Me,     Kitchen Fun With My Three Sons,       The Chiffon Diary,     Manic Mother,     The Thriftiness Miss,     Say Not Sweet Anne,     Becoming Martha,     Too Much Time On My Hands,     Destination Craft,     The Dedicated House,      Katherine's Corner,   C.R.A.F.T.,    Fluster Buster,     Nap Time CreationsThe Mandatory MoochLamberts Lately


Thursday, June 13, 2013

A Birthday Countdown Fit For A Princess

I was thrilled when I heard the material for the next round was paper. I hoard paper about as much as I hoard fabrics. I thought of a few ideas but because my daughter’s birthday is approaching and she has no concept of time, I decided to make her a birthday countdown so she might stop asking me how many more days until her birthday.
 
 
I’d been saving this old cabinet door I bought for a $1 at a flea market and decided to use it for my birthday countdown. I had to clean it first. Boy was it dirty.
 
Then I painted it pink.

I picked out 4 different black printed scrap papers to make a border (I love it when I’m able to go to my scrap heap).

I Modge Podged it and then added a lighter pink stencil design to make it look a little more regal.


I added a little washi tape for a border.

. I made paper triangles with the number of days until her birthday attached to black string with tiny little pink clothes pins.


When a day goes by, we flip a triangle over and reattach it to the clothespin.


 I made a paper pinwheel to add to the corner and attached ribbon at the top so I’d be able to hang it up.


It went from an old cabinet door to a birthday countdown fit for a princess.

Unfortunately, I did not make it to the next round. But at least I went out with a project that was close to my heart. And making it to the top 5 was a huge honor. Thanks to all of those that voted.
By the way....check out my work space. Crafting gets a little crazy at the Kaminski household.


Linking Up With These Great Blogs:

Alderberry Hill,      Tutus and Tea Parties,      The Rustic Pig Designs,      Or So She Says,      My 1929 Charmer,      Super Handmade Sunday @ A Cat- Like Curiosity,      Lil' Luna          Craft Geek,      Simple As That,       House on the Way,      Sassy Sites,      Mindy May's Market,   Skip To My Lou,        Sugar Bee Crafts,      Cheap Crafty Mama,      Be Different, Act Normal,   Homemaker In Heels,     The Busy Bee's,      Fireflies and Jellybeans,    The Shabby Creek Cottage,     30 Handmade Days,     52 Mantels,     The Shabby Nest,     Lovely Crafty Home,  See Vanessa Craft,     Blissful Bucket List,     Bacon Time With The Hungry Hypo,     Lena B, Actually,     Pocket Full of Pink,     Family Ever After,      I Heart Naptime,     Six Sisters Stuff,  Nifty Thrifty Things,     Homemaker on a Dime,     Under The Table and Dreaming,     Flamingo Toes,    It's Overflowing,    Ivy And Elephants,    Clean and Scentsible,    Creations by Kara,     Tip Junkie,      Love and Laundry,      Create. Craft. Love.,     Sarah Dawn Designs,     One Artsy Mama,      Tatertots and Jello,     The Grant Life,     The Hubby Made Me,     Kitchen Fun With My Three Sons,       The Chiffon Diary,     Manic Mother,     The Thriftiness Miss,     Say Not Sweet Anne,     Becoming Martha,     Too Much Time On My Hands,     Destination Craft,     The Dedicated House,      Katherine's Corner,   C.R.A.F.T.,    Fluster Buster,     Nap Time CreationsThe Mandatory MoochLamberts Lately


Monday, June 10, 2013

A Super Hero Father's Day Card

I wanted to make Russell a special Father's Day Card from Sophia and since they both LOVE their Super Hero's, I knew exactly what I wanted to make....a card fit for a Super Hero.
 
I started with a double sided piece of scrapbook paper measuring 10 x 7. Then I folded both sides to meet in the middle. Next I cut out a tie to add to the front.
 

I bent down the corners to look like a collar and glued a few buttons down the middle as well.

I found a dark denim paper and glued it in the middle to have a solid background (measuring 5 x 7).

I glued the tie on the front, left side.

 
I used my Superman Cricut cartridge to cut out the Superman emblem and my Mickey Mouse cartridge to cut out the letters.
Now Sophia just needs to sign it!


Linking Up With These Great Blogs:

Alderberry Hill,      Tutus and Tea Parties,      The Rustic Pig Designs,      Or So She Says,      My 1929 Charmer,      Super Handmade Sunday @ A Cat- Like Curiosity,      Lil' Luna          Craft Geek,      Simple As That,       House on the Way,      Sassy Sites,      Mindy May's Market,   Skip To My Lou,        Sugar Bee Crafts,      Cheap Crafty Mama,      Be Different, Act Normal,   Homemaker In Heels,     The Busy Bee's,      Fireflies and Jellybeans,    The Shabby Creek Cottage,     30 Handmade Days,     52 Mantels,     The Shabby Nest,     Lovely Crafty Home,  See Vanessa Craft,     Blissful Bucket List,     Bacon Time With The Hungry Hypo,     Lena B, Actually,     Pocket Full of Pink,     Family Ever After,      I Heart Naptime,     Six Sisters Stuff,  Nifty Thrifty Things,     Homemaker on a Dime,     Under The Table and Dreaming,     Flamingo Toes,    It's Overflowing,    Ivy And Elephants,    Clean and Scentsible,    Creations by Kara,     Tip Junkie,      Love and Laundry,      Create. Craft. Love.,     Sarah Dawn Designs,     One Artsy Mama,      Tatertots and Jello,     The Grant Life,     The Hubby Made Me,     Kitchen Fun With My Three Sons,       The Chiffon Diary,     Manic Mother,     The Thriftiness Miss,     Say Not Sweet Anne,     Becoming Martha,     Too Much Time On My Hands,     Destination Craft,     The Dedicated House,      Katherine's Corner,   C.R.A.F.T.,    Fluster Buster,     Nap Time CreationsThe Mandatory MoochLamberts Lately


Round 4 Voting is LIVE

Round 4 voting for One Crafty Contest is LIVE. SO go vote for your favorites!
One Crafty Contest


Friday, June 7, 2013

Summer Banner


For the Glitter Round of  One Crafty Contest, I had a back up plan in case my Home letters didn't turn out as planned. I decided a Summer banner would be the perfect back up plan.
I started with making a template for my triangles (seen in the yellow triangle below). I used craft paper brown paper cut into 9.5 x 5.5 pieces. I marked each rectangle at the bottom with a little mark where the point hit the middle.


I lined the corner of the top of the rectangle to the point marked and cut each side.


Then I used a red paint and then a layer of red glitter paint for the decorative scalloped edge.

Then I made my pinwheels using 2 x 12 inch strips of paper.


Then I cut the letters SUMMER using my Cricut and glued them to the pinwheels.

Before I glued them down, I added a couple of layers of red glitter paint to the top.


Then I used some twine to tie the triangles together. I unraveled the ends to give it some texture.


And here is my updated Summer mantle.

Linking Up With These Great Blogs:

Alderberry Hill,      Tutus and Tea Parties,      The Rustic Pig Designs,      Or So She Says,      My 1929 Charmer,      Super Handmade Sunday @ A Cat- Like Curiosity,      Lil' Luna          Craft Geek,      Simple As That,       House on the Way,      Sassy Sites,      Mindy May's Market,   Skip To My Lou,        Sugar Bee Crafts,      Cheap Crafty Mama,      Be Different, Act Normal,   Homemaker In Heels,     The Busy Bee's,      Fireflies and Jellybeans,    The Shabby Creek Cottage,     30 Handmade Days,     52 Mantels,     The Shabby Nest,     Lovely Crafty Home,  See Vanessa Craft,     Blissful Bucket List,     Bacon Time With The Hungry Hypo,     Lena B, Actually,     Pocket Full of Pink,     Family Ever After,      I Heart Naptime,     Six Sisters Stuff,  Nifty Thrifty Things,     Homemaker on a Dime,     Under The Table and Dreaming,     Flamingo Toes,    It's Overflowing,    Ivy And Elephants,    Clean and Scentsible,    Creations by Kara,     Tip Junkie,      Love and Laundry,      Create. Craft. Love.,     Sarah Dawn Designs,     One Artsy Mama,      Tatertots and Jello,     The Grant Life,     The Hubby Made Me,     Kitchen Fun With My Three Sons,       The Chiffon Diary,     Manic Mother,     The Thriftiness Miss,     Say Not Sweet Anne,     Becoming Martha,     Too Much Time On My Hands,     Destination Craft,     The Dedicated House,      Katherine's Corner,   C.R.A.F.T.,    Fluster Buster,     Nap Time CreationsThe Mandatory MoochLamberts Lately